
Introduction
Setting Up and Using Visual Studio Code (VSC) with the LEGO® Education Python Package
Use this tutorial for installing Visual Studio Code (VSCode), the Python Programming Language, and the LEGO® Education Python Package locally on your computer. And for configuring everything so you can use all three to interact with the LEGO Education Hardware (from the Science and Computer Science & AI kits) with Python code.
Steps:
- Install VSC
- Install Python
- Connect VSC to GitHub
- Check Python from VSC
- Install Extensions
- Create Project Folder
- Create Virtual Environment
- Install the Package
- Update Hardware Firmware
- Python Code
- Use GenAI to write Code
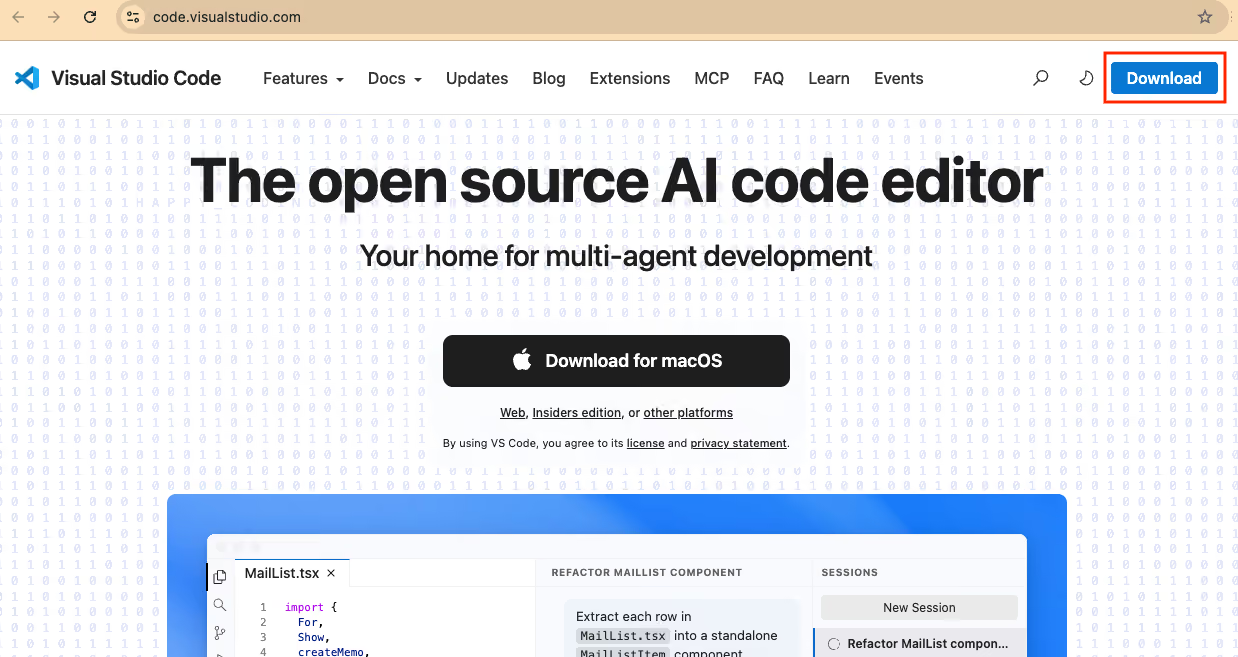
1: Install Visual Studio Code (code editor developed by Microsoft) on your machine
Go to https://code.visualstudio.com
Download and install the Visual Studio Code (VSC) application on your computer.
2: Install Python (programming language) on your machine
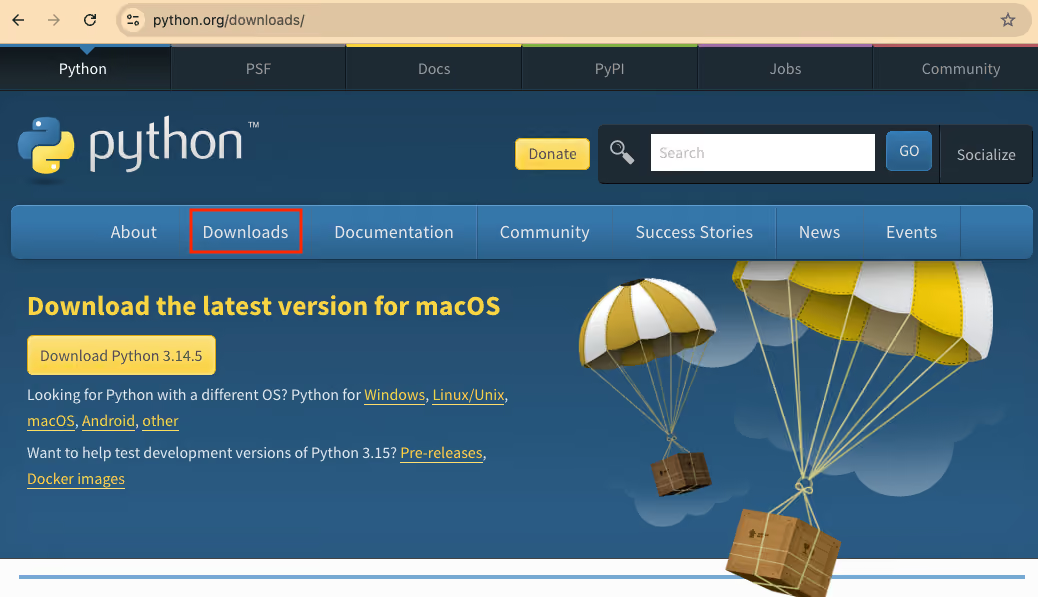
Go to https://www.python.org/downloads/
Download and install the latest version of the Python programming language on your computer. (The LEGO Education Python Package requires Python version 3.11 or later.)
3: To enable GenAI features, you need to Connect VSC with GitHub
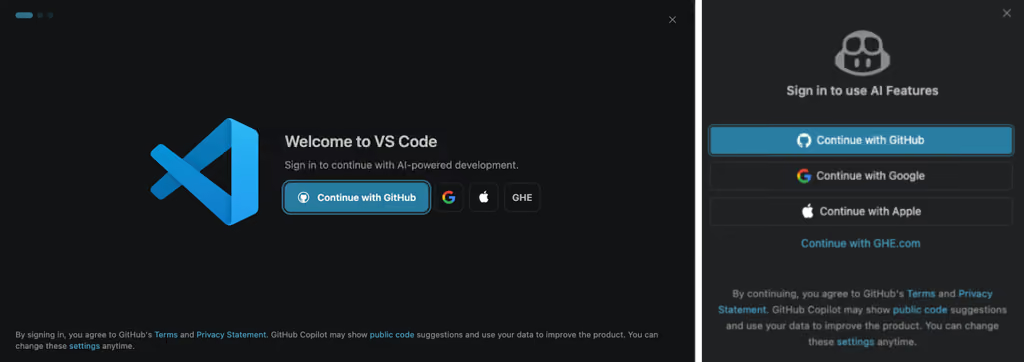
When you open VSCode for the first time, it may prompt you to “Continue with GitHub”. This enables the Generative AI features, such as AI-powered development (aka coding with AI).
THIS STEP IS OPTIONAL. This is only to enable GenAI (via GitHub Copilot) to help write python code.
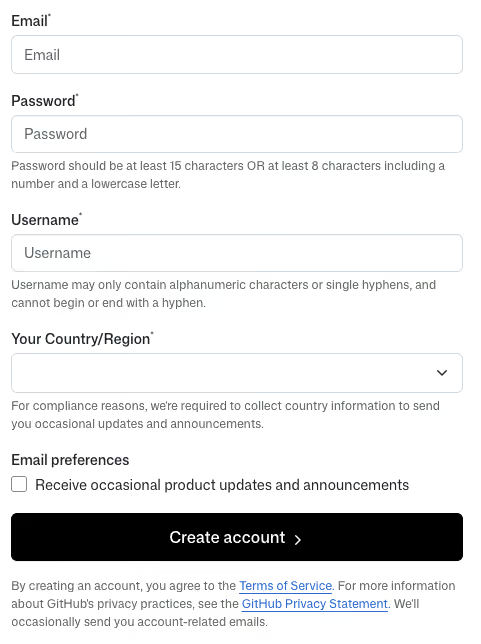
If you do not have a GitHub account, you need to create one. Go to https://github.com/signup
- Use your email address. Create a unique password for GitHub.
- Choose a username. This will be your GitHub username displayed publicly on GitHub.
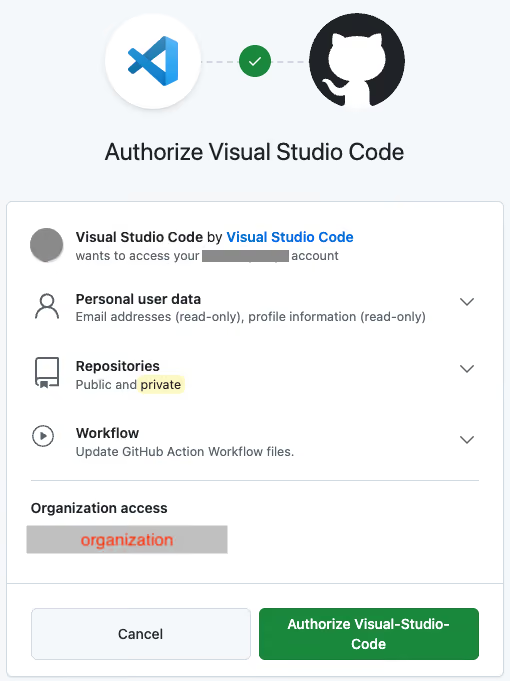
In VSCode, click the “Continue with GitHub” which will take you to a GitHub login screen. Use your GitHub email and username to log in.
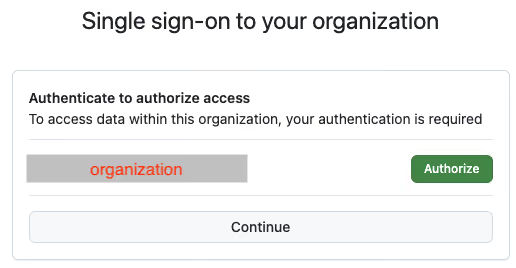
Once logged in, you will be prompted to connect your GitHub account with VSCode. This will allow GitHub and VSCode to communicate with each other. There may be additional steps of signing into a group account (for an organization) or authorizing a group (or orgnaization) as part of the process.

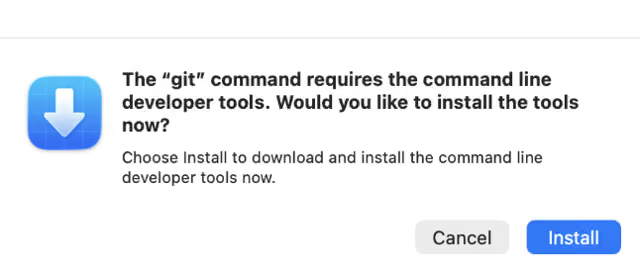
Note: after connecting Visual Studio Code and GitHub, you may be prompted to install the command line developer tools in order to use git. This is not necessary (if you are just writing/running Python code); however, this also is not dangerous or problematic so you can do this if you want.
4: Use VSC to check that Python was installed
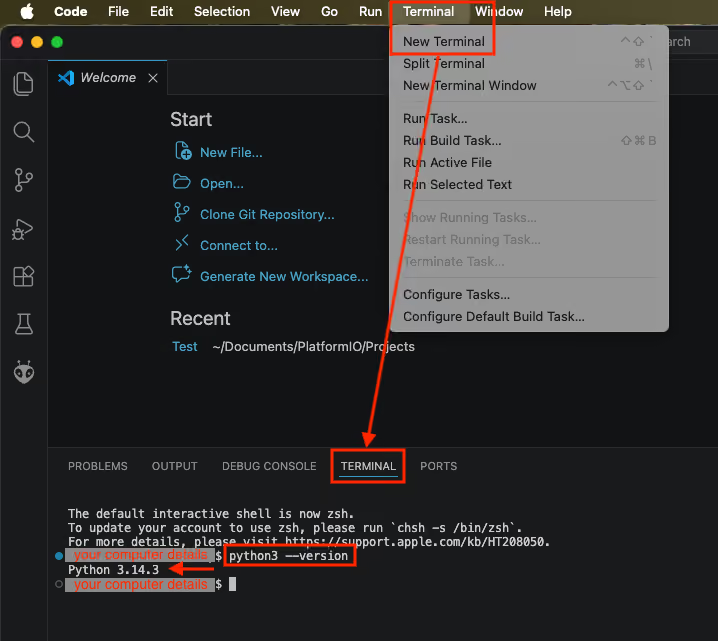
We are going to use Visual Studio Code (VSC) to check that Python was successfully installed on your computer (and that Visual Studio Code can access it).
VSC has an embedded terminal (a text-based user interface for interacting with the computer) which provides a command line interface (CLI) for manually typing and running commands.
- Launch a new terminal to get the command line interface
- Type
python --versionat the command line interface and hit enter - If you get an error, you may have to use
python3 --versioninstead. If so, usepython3for python commands in the future. - It will print the version of Python that is installed on your computer. It should be version 3.11 or later (as per the LEGO Education Python Package).
5: Install the Python Extension and Pylance Extension for Visual Studio Code
Microsoft (creators of Visual Studio Code) have created two extensions that make interacting with Python easier. These are available under the Microsoft Marketplace.
- Open the Microsoft Marketplace
- Search for “Python” and select/install the Python Extension
- Search for “Pylance” and select/install the Pylance Extension
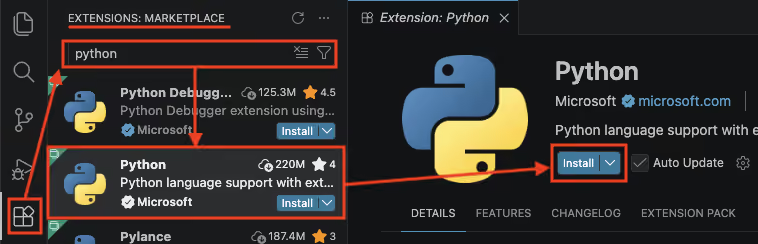
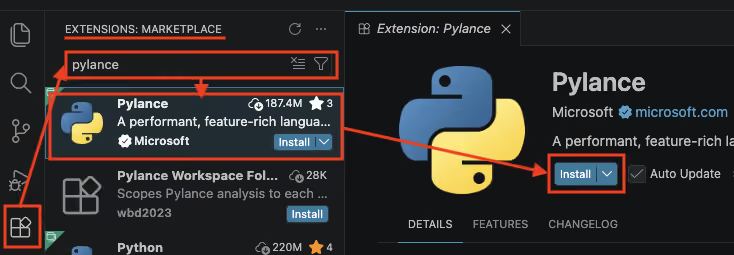
Both of these are created and distributed by Microsoft to work with Visual Studio Code so can be trusted, installed, and enabled on your computer.
AFTER INSTALLING: quit-and-restart Visual Studio Code to make sure installation worked and changes take effect.
6: Create a project folder to hold your Python project and your Python code
This could be on your Desktop, in your Documents, or somewhere else you want to keep your code.
NOTE: some users (e.g. with school or work administered computers) have had trouble when using cloud-based networked or mounted folders. Thus, it is recommended to use a local folder stored on your computer in a location such as Documents or Desktop, instead of remotely in a network/mounted storage services (e.g. not using OneDrive, SharePoint, Google Drive, Dropbox, etc for your project).
In Visual Studio Code:
- Select the Explorer from the left-hand menu
- Select “Open Folder” and browse to your project folder (or create a new folder via the dialog)
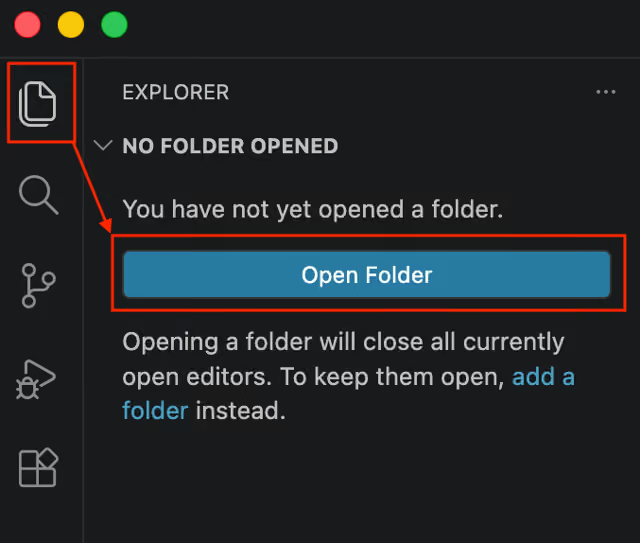
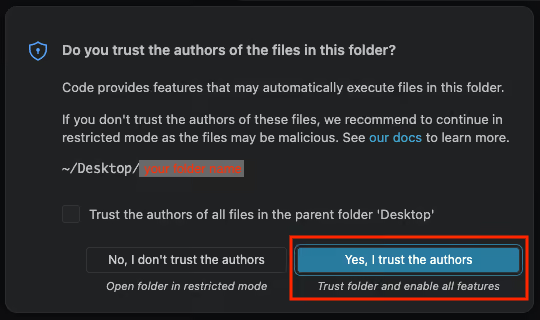
Because Visual Studio can run and execute code on your computer, you need to grant access to that folder. YOU will (eventually) be the author of the Python code running in this folder, so you should “Trust folder and enable all features.” This means you should NOT put untrusted code into this folder, because now Visual Studio has permission to execute and run the code.
7: Create a Virtual Environment within your project folder
Creating and configuring a virtual environment on your computer gives your LEGO Education Python project its own isolated Python setup. In this way, any packages (e.g. the LEGO Education Python Package) installed for this project will not interfere with anything else installed on your computer. The instructions below will create a virtual environment (inside your project folder), configure it to have the LEGO Education Python Package installed, and show you how to activate it when working on your code.
What is a Virtual Environment?
A virtual environment is a self-contained Python workspace for a single project. Instead of installing packages globally on your computer, packages are installed only inside that project’s environment. This keeps projects organized and avoids version conflicts between different tools or assignments. Most modern Python projects use virtual environments because they make setups cleaner, easier to reproduce, and less likely to break other projects on your system.
Virtual environments can be created by a user without administrative privileges on their computer. Note that the setup commands are different based on your operating system and how Python was installed.
Create a Project Folder
If you haven't already, create or open the folder that will contain your Python project (and all your code associated with your project). This is called your project directory. In most cases, you will create the virtual environment directly inside this folder so everything related to the project stays together.
Your terminal should be currently inside your project directory before continuing.
Check that Python Is Installed
Before creating a virtual environment, make sure Python is installed on your computer (and that the terminal can access it from your project folder). You can test this by opening the terminal (either provided by the operating system or integrated in your IDE) and typing the following within your project folder. In Visual Studio Code, , open a terminal (Terminal → New Terminal) to get a command line interface.
python --version
If that does not work, try the following:
python3 --version
You should see a Python version number printed in the terminal. If not, install Python first before continuing.
Creating the Virtual Environment
The first time you set up a project, you will create a virtual environment. In the terminal, type:
python -m venv venv
If your system used python3 instead of python, use:
python3 -m venv venv
This command will take a minute and creates a new folder named venv inside your project directory. That folder now contains an isolated Python installation and will contain all relevant packages installed for this project.
Activating the Virtual Environment
Before installing packages or running project code, activate the virtual environment. (If these commands don’t work for your OS/configuration, see alternatives listed at the bottom of this step.)
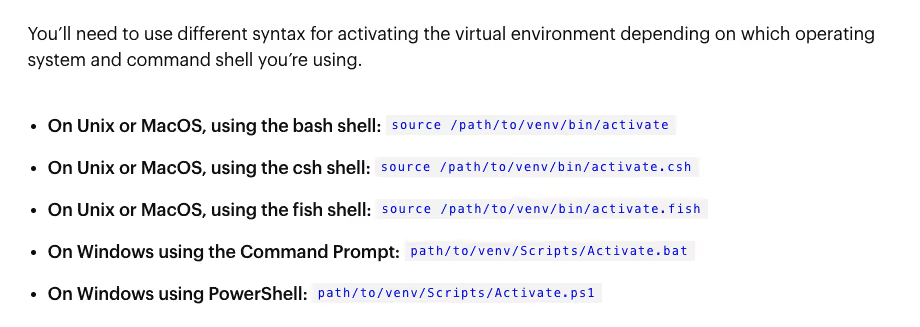
On Windows:
venv\Scripts\activate
On macOS or Linux:
source venv/bin/activate
After activation, you will see (venv) appear at the beginning of the terminal prompt. This indicates that commands are now using the project’s virtual environment (instead of the system-wide Python installation).
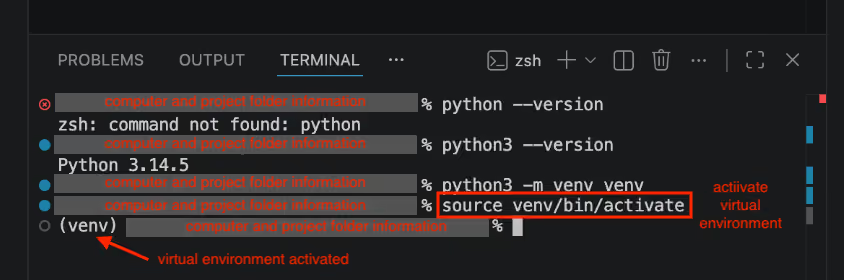
Every time you want to use this virtual environment, you need to "activate" it to once again get the (venv) at the beginning of the terminal prompt.
NOTE: Different operating systems and environments use slightly different commands for activating a virtual environment. More details in this article. A summary of some options are:
Using the Environment Later
You only create and configure the virtual environment once, but you must activate it each time you reopen the project and want to work on it.
A typical workflow is:
- Open the project folder in your IDE (Integrated Development Environment)
- Open the integrated terminal
- Activate the virtual environment:
- Windows:
venv\Scripts\activate - macOS/Linux:
source venv/bin/activate
- Run your Python code
The venv folder should remain inside your project directory so it can be reused later.
Deactivating the Environment
When you are finished working for a session, you can deactivate the virtual environment by typing:
deactivate
This returns the terminal to your normal system Python environment (e.g. won't have (venv) at the beginning of the terminal prompt).
Troubleshooting
If a command does not work, the issue is usually one of three things: Python is not installed, the terminal is not inside the correct project folder, or the virtual environment has not been activated. Use the error message to understand the problem and search for a solution.
8: Install the LEGO Education Python Package
The LEGO Education Python Package is Python code written by LEGO Education that is necessary for interacting with the hardware. You will install this code on your computer, inside the virtual environment.
- In the terminal (with the
(venv)activated), typepip install legoeducationand hit enter- This will install the LEGO Education Python Package
- NOTE: if you receive an error regarding the
pipcommand, it may need to be installed/updated.- In the terminal, type
python -m pip install --upgrade pipand hit enter - After installing/upgrading pip, retry the oroginal
pip install legoeducationcommand - If pip is not working, you can install via Python directly:
python -m pip install legoeducation
- In the terminal, type
This will install the LEGO Education Python Package onto your machine. For more information:
- LEGO Education Python Package entry in the Python Package Index (PyPI)
- LEGO Education Python API Documentation
The terminal will show progress as it installs the LEGO Education Python Package. This involves finding and downloading relevant files and other dependencies and installing on top of Python running inside your virtual environment. Look for any error messages or failures. It should report success at the end.
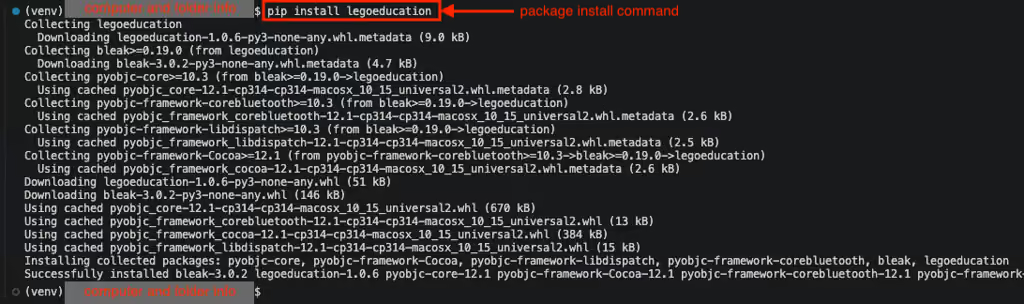
To confirm the LEGO Education Python Package installed correctly:
- In the terminal, type
pythonand hit enter to start the Python Interpreter - In the Python Interpreter, type
import legoeducation as leand hit enter; this should NOT give an error - Check the version number by typing
le.__version__and hit enter; it should display the version number string of the LEGO Education Python Package installed - Exit the Python Interpreter by typing
exit()and hitting enter. This will return back to the terminal.

Note: you only have to create the virtual environment and install the LEGO Education Python Package once for this project folder. In the future, if you return back to this project, just activate the virtual environment again and Python will be configured properly to interface with the hardware.
- (Re)activate virtual environment on Windows:
venv\Scripts\activate - (Re)activate virtual environment on macOS or Linux:
source venv/bin/activate
9: Update the firmware on any LEGO Education Hardware you are using
Before interacting with LEGO Education Hardware via the Python Package, make sure the hardware is running the latest firmware.
- In your browser, go to the LEGO Education Coding Canvas
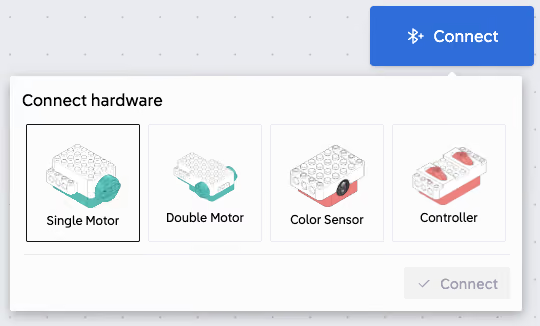
- Create a New Project and use the “Connect” button to connect to the hardware you are planning on using
- If needed, the Coding Canvas will automatically update the firmware. Once updated, you can disconnect the hardware from the Coding Canvas (or just shut the browser window)
- For more information, see the How to update your hardware page on the Teacher Portal.
10: Use Python to interact with your LEGO Education Hardware
At this point your computer should be configured and the LEGO Education hardware ready.
- See Python examples on the LEGO Education Python API documentation for how to connect to and interact with the LEGO Education hardware:
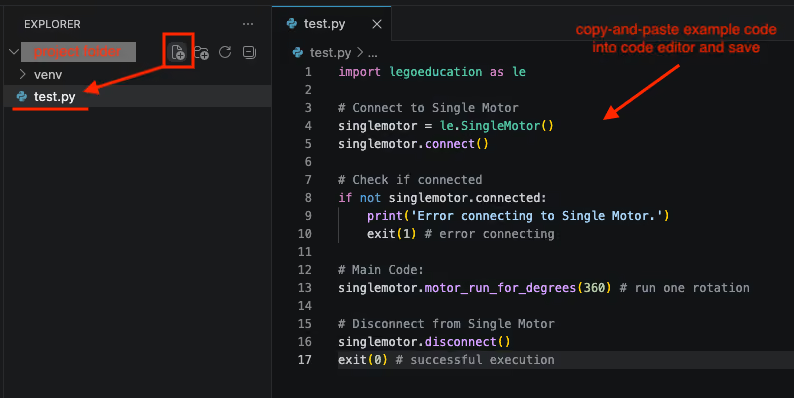
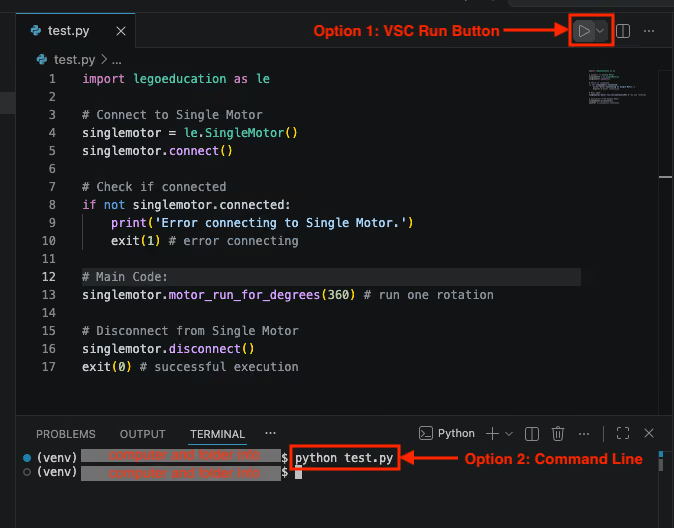
- Write the Python code in Visual Studio Code, save the file locally to your project folder (e.g.
test.py)
import legoeducation as le

# Connect to Single Motor
singlemotor = le.SingleMotor()
singlemotor.connect()

# Check if connected
if not singlemotor.connected:
	print('Error connecting to Single Motor.')
	exit(1) # error connecting

# Main Code:
singlemotor.motor_run_for_degrees(360) # run one rotation

# Disconnect from Single Motor
singlemotor.disconnect()
exit(0) # successful execution
- Run your code with Python (via the VSC run button or by typing
python test.pyin the terminal)
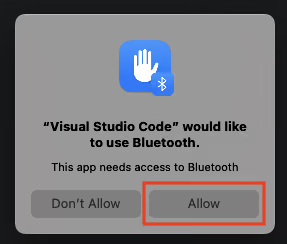
Note: the LEGO Education Python Package uses Bluetooth to communicate with the LEGO Education Hardware. The first time you run the code you may need to give VSC access to Bluetooth.
11: Use GenAI to write Python code for the LEGO Education Python Package
This step is only if you activated and connected GitHub Copilot (in step 3) to VSCode.
If you optionally connected your Visual Studio Code application to GitHub (back in step 3), then you should be able to use Generative AI (GitHub Copilot) to write Python code for interacting with the LEGO Education Python Package.
You can improve the accuracy of the GitHub Copilot responses by providing custom instructions.
- In your project folder, create a sub-folder called
.github - Inside the
.githubfolder, add acopilot-instructions.mdfile - The AI Chat will now use these instructions to help guide its behavior.
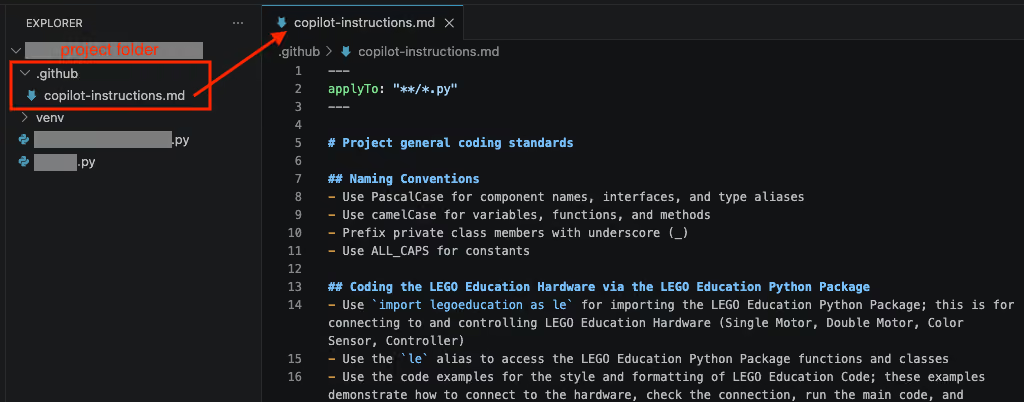
Here is an example copilot-instructions.md file to add to the .github folder in your project. This example contains code for the LEGO Education Python Package from the LEGO Education Python API Documentation website to help guide the GitHub Copilot in writing LEGO Education Hardware compatible code.
Example using the GitHub Copilot GenAI Chat to write code
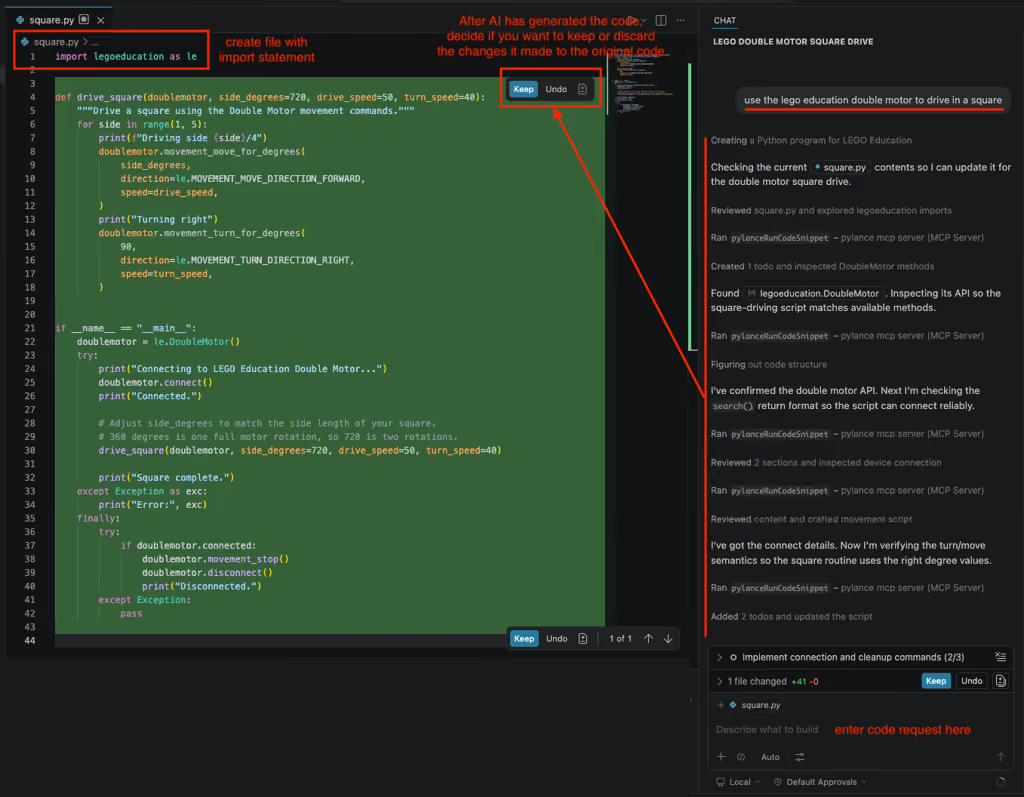
Create a new file (eg. square.py) and write the import statement at the top (import legoeducation as le). This helps the GenAI know what Python Package you are using so it can look up the right documentation.
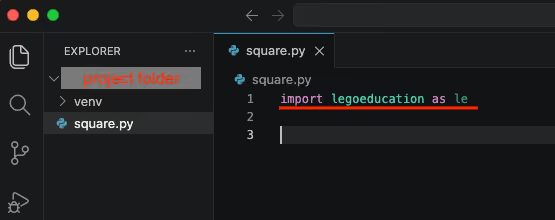
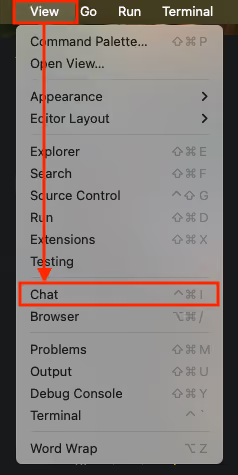
If not currently visible, open the Chat window (View → Chat).
Give the chat a description of what code you want written:
- e.g.
turn the lego education single motor 360-degrees - e.g.
use the lego education double motor to drive in a square - e.g.
combine the controller with the double motor so the levers direct drive the motors
If configured correctly, the GenAI will think about the problem, view any initial starter code inside your editor, read the appropriate source files and/or documentation, and generate a solution. It will show any changes it made to your code in the editor (red is code it deleted/changed, green is new code it added/updated). After selecting to “Keep” the new code you want, you can save-and-run this file to test the code.
Using Other AI Language Models in VS Code
In addition to the default GitHub CoPilot, it is possible to connect the VS Code Editor Chat feature to other AI Language Models.
See the AI language models in VS Code help tutorial from Visual Studio Code for instructions on how to Change the model for chat. in order to access other models.
.avif)
.svg)